Flat lay photography produces some of the most striking and versatile images in commercial and lifestyle photography, yet the setup is surprisingly minimal. You don’t need a studio. You don’t need a large gear budget. What you do need is an understanding of how composition, light, and texture work together when shooting straight down.
This guide covers everything from choosing and styling your objects to lighting, lens selection, and the depth of field techniques that separate a professional flat lay from a cluttered overhead snapshot.
Video by Anthony Gugliotta
What Is Flat Lay Photography?
Flat lay photography is a shooting style where objects are arranged on a flat surface and photographed from directly above, with the camera pointed straight down at 90 degrees. The result is a top-down image where every element sits on the same visual plane.
It’s used across a wide range of contexts:
- Product photography: highlighting a single item within a curated context
- Fashion and apparel: displaying clothing, accessories, or outfit combinations
- Food and beverage: restaurant menus, recipe content, brand imagery
- Events and weddings: detail shots of rings, invitations, florals, and personal items
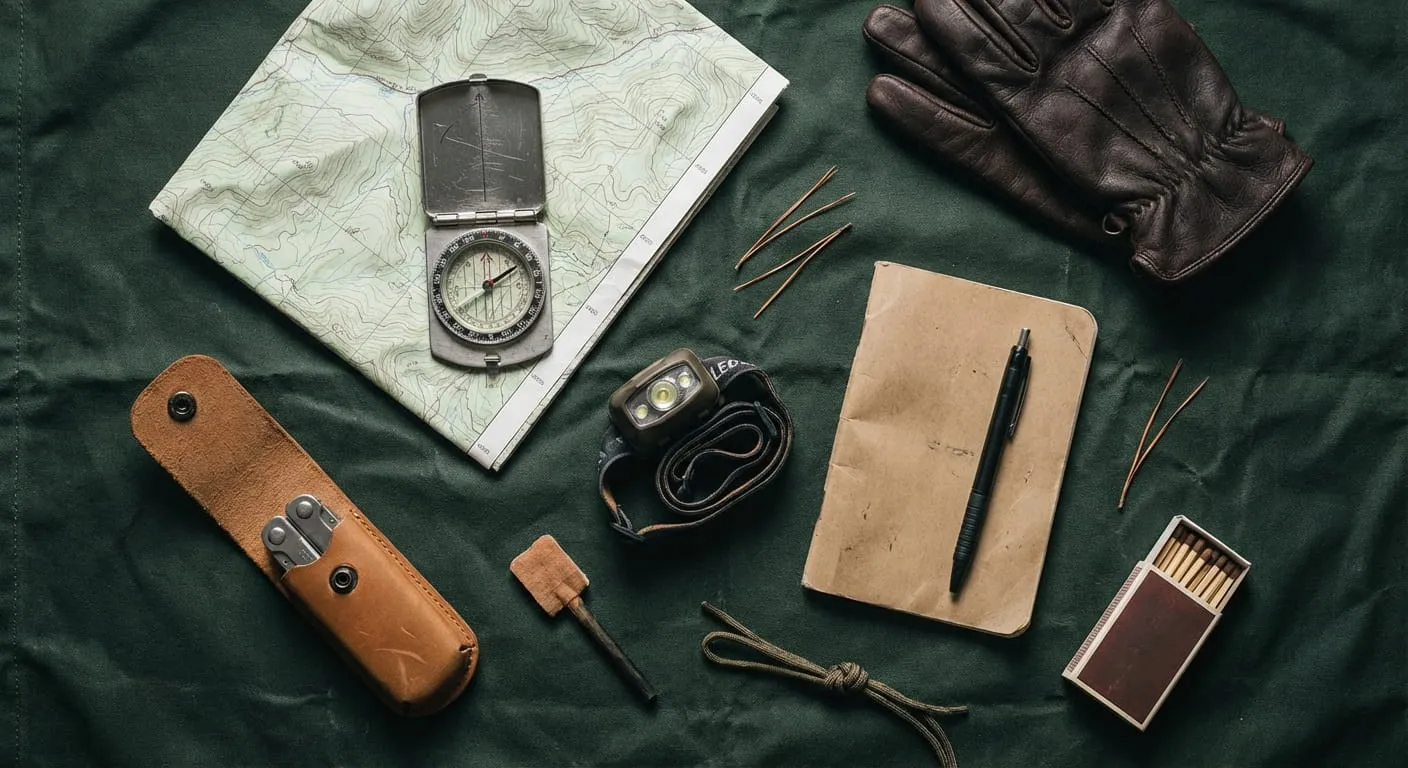
- Documentation: cataloguing camping gear, EDC (everyday carry) kits, travel packs, or project materials
In every case, the goal is the same: tell a story. A great flat lay isn’t just a collection of objects, it’s a coherent scene where every element earns its place.
Choosing Your Supporting Objects
The main subject is the anchor of the image. Everything else should reinforce it, not compete with it.
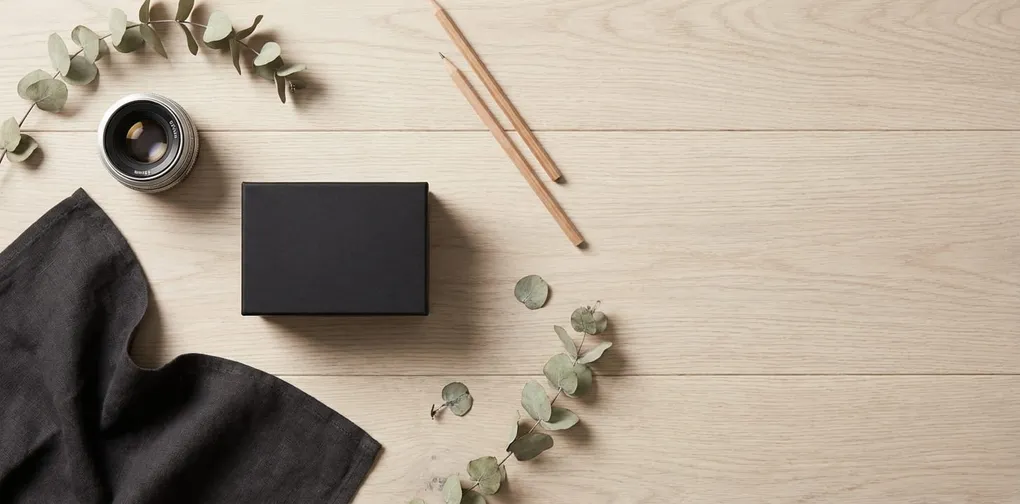
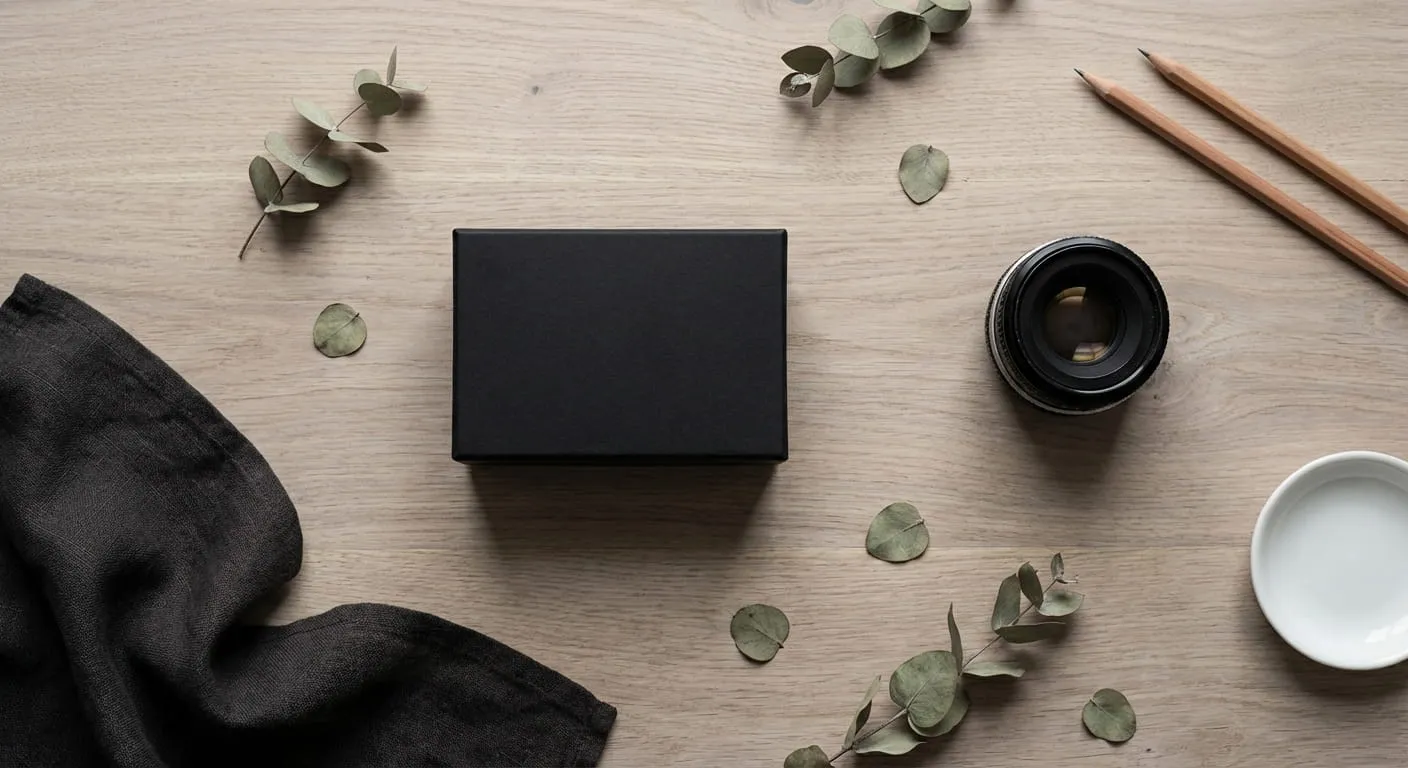
Start by asking: what does this object represent? Then surround it with items that share that same theme or identity. A handmade card deck about creativity might be surrounded by camera lenses, sketchbooks, pencils, and ribbon. A skincare product might sit alongside raw ingredients, linen fabric, and a ceramic dish. The relationship between objects is what gives the image meaning.
Keep the color palette in check. If your main subject is dark, monochromatic, or muted, don’t introduce bright or saturated supporting items. They will pull the viewer’s eye away from the thing you’re trying to show. Match the tonal range of your subject. If the product is neutral, keep supporting items neutral. If it has a bold accent color, echo that color sparingly.
Vary texture, not just shape. Flat lays become visually interesting when there’s contrast between materials: a rough linen fabric next to a polished metal surface, matte paper next to a reflective lens. Texture gives the image depth and tactile interest that shape alone can’t provide.
Layering: Using Depth to Isolate Your Subject
One of the most effective techniques in flat lay photography is raising your main subject slightly above the surface. It sounds counterintuitive for a style built around flatness, but a small elevation (even just a stack of erasers or a thin book underneath) creates enough physical distance to allow your lens to separate it from the background using depth of field.
When you shoot at a wide aperture like f/1.8 or f/2, the elevated subject stays sharp while the items resting directly on the surface fall slightly soft. This softness keeps them visible and contextual without letting them distract from the hero item. The viewer’s eye goes immediately to the in-focus element.
This technique is subtle but powerful. Without it, every object competes for equal attention across a completely sharp frame.
Composition and Object Orientation
Think of your flat lay as a mini stage. You’re directing where the eye goes and in what order.
The main subject should sit near the center of the frame, oriented squarely and cleanly. Supporting objects work best when they’re angled: pointing toward the center, fanning outward, or placed at deliberate diagonals. This creates movement and energy in an otherwise static, overhead shot.
Leave negative space. A flat lay doesn’t need to fill every corner. Empty areas of your background material (wood grain, fabric, paper) give the eye a place to rest and actually make the styled objects feel more intentional.
Avoid symmetry for its own sake. A perfectly mirrored arrangement reads as staged rather than curated. Slight asymmetry and varied object sizes feel more natural and hold attention longer.
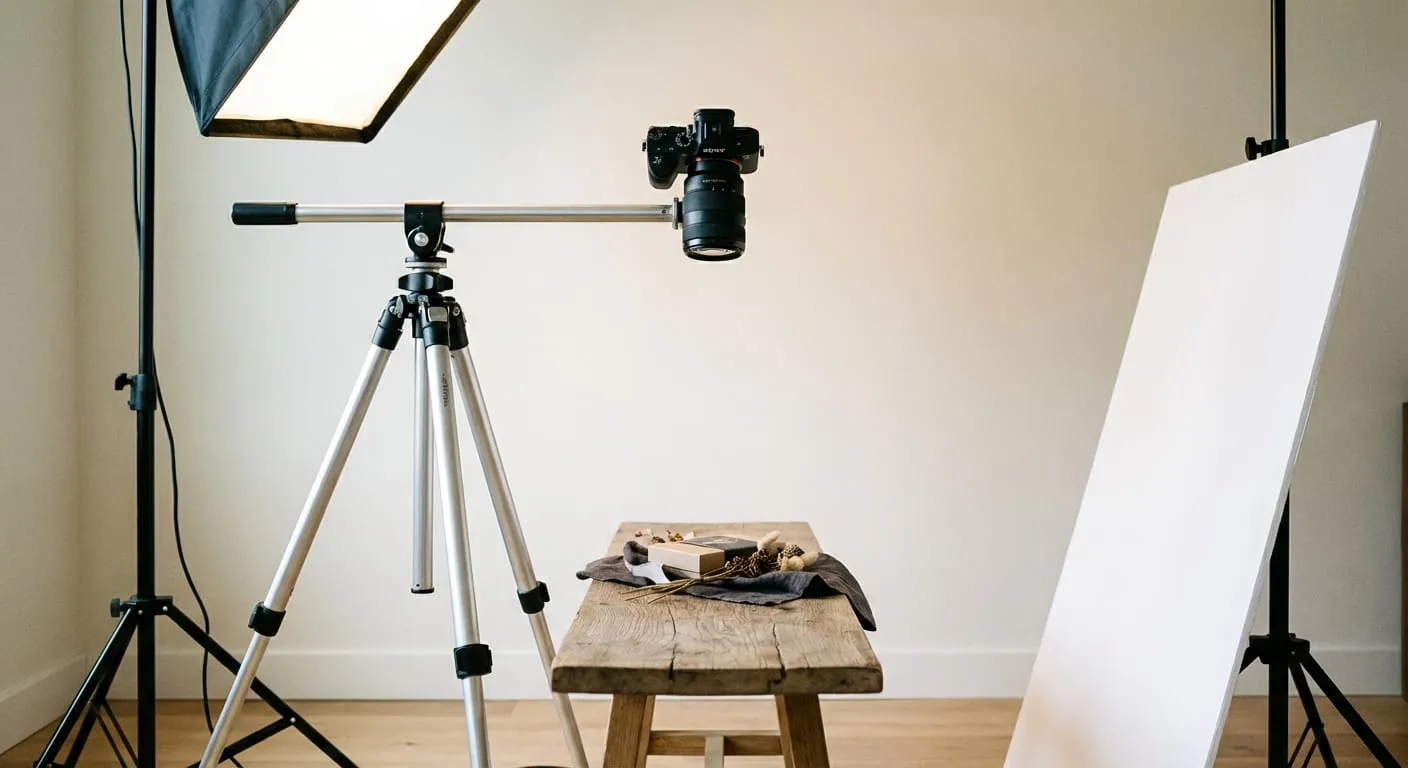
Setting Up Your Flat Lay Space
A flat lay studio can be assembled in any room with a few basic elements.
Surface: A single piece of material determines the mood of the entire image. Options include:
- Hardwood planks or flooring offcuts (warm, organic)
- Concrete tiles or painted boards (cool, minimal)
- Linen or cotton fabric (soft, lifestyle)
- Marble contact paper (luxury, clean)
Elevate your surface on a stool or table to give yourself room to position lights around it and shoot from directly above without your shadow falling into the frame.
Camera position: Mount your camera on a tripod with the arm extended horizontally so the lens points straight down. This keeps the frame level and your hands free to adjust objects between shots.
Lighting a Flat Lay
Flat lay photography is lit from the side, not from directly above. Overhead lighting flattens texture and eliminates the subtle shadows that give objects dimension.
The basic setup: a single softbox positioned to one side, angled slightly downward toward the surface. This creates directional light with soft shadows that reveal texture in fabric, wood grain, and paper.
Fill the shadows: place a white reflector or foam board on the opposite side. It won’t add a new light source, it will simply bounce some of the existing light back into the shadows, softening them without eliminating the directional quality that makes the image interesting.
Working with reflective objects: lenses, metal tools, glossy packaging, and printed materials with gloss coatings all reflect light differently depending on its position. This is worth experimenting with deliberately. Moving your light source left or right by even 20 centimeters can reveal or hide text printed on a glossy surface, or make a metallic object glow versus appear flat. Let the reflections work for you.
Upgrading your light: an RGB LED tube light (like the Nanlite Pavo Tube) adds flexibility beyond a softbox. You can adjust color temperature for warmth or coolness, reduce intensity for a more dramatic look, or shift to a subtle color cast that complements the objects in your scene. For reflective objects especially, a softly colored light source can add a beautiful ambient reflection without an unnatural glow.
Lens and Camera Settings
The right lens makes a significant difference in flat lay photography, not for sharpness, but for how it renders perspective.
Recommended focal lengths: 50mm, 85mm, or 135mm. Longer focal lengths compress the scene, which keeps objects near the edges of the frame from appearing distorted or larger than they are relative to the center. Wide-angle lenses (24mm, 35mm) stretch the edges and can make a carefully composed flat lay look unbalanced.
Aperture: shoot between f/1.8 and f/4 depending on how much you want the depth of field separation effect discussed earlier. At f/1.8 with an elevated subject, the separation will be quite pronounced. At f/4, it’s subtle but still present. If everything in the scene is resting on the same plane and you want it all sharp, close down to f/5.6 or f/8.
Shutter speed and ISO: with a tripod and controlled artificial lighting, you can use a low ISO (100–400) and a shutter speed slow enough to properly expose without camera shake being a concern. Use a remote shutter release or the camera’s self-timer to eliminate any vibration from pressing the shutter button.
Flat Lay Photography as a Learning Tool
Flat lay photography is one of the most practical ways to develop foundational photography skills away from the pressure of a live shoot. In a controlled, stationary setup you can experiment with:
- Light direction and quality: move a single softbox around and observe exactly what changes in the shadows, textures, and reflections
- Depth of field: swap apertures and move your subject up and down to see how both variables interact
- Composition: rearrange objects and reshoot, comparing what works and what doesn’t without time constraints
Because the subject stays still and the environment is under your control, you can isolate each variable and learn from it deliberately. It’s also an easy style to incorporate into building a photography portfolio: product and lifestyle flat lays are in constant demand for brands, e-commerce sellers, and social media content creators.
Frequently Asked Questions
What is flat lay photography?
Flat lay photography is a style where objects are arranged on a flat surface and photographed from directly overhead. It’s widely used in product photography, fashion, food, lifestyle content, and event documentation. The goal is to tell a story or highlight a subject by arranging supporting items around it.
What lens is best for flat lay photography?
An 85mm or 135mm lens is ideal for flat lay photography. Longer focal lengths compress the scene, preventing the edge distortion you’d get with a wide-angle lens. A 50mm lens also works well. Combine this with a wide aperture (f/1.8–f/2.8) to isolate your subject using depth of field.
What lighting do you need for flat lay photography?
A single softbox positioned to one side is enough for most flat lay setups. Add a reflector on the opposite side to fill in shadows without creating a second harsh light source. For more control, an RGB LED tube light lets you adjust color temperature, brightness, and even add subtle color effects to reflective objects.
How do you style a flat lay?
Start with your main subject and build around it with items that share the same story or theme. Vary the texture and material of supporting objects (fabric, metal, matte surfaces) while keeping the color palette cohesive. Raise the main subject slightly above the surface so you can separate it from the background using depth of field. Angle supporting items toward the center to draw the eye inward.
Can you do flat lay photography at home?
Yes. A piece of hardwood, tile, or textured paper on a table or stool is all you need for a surface. A single window providing diffused natural light, or a portable softbox, handles lighting. The key is choosing objects deliberately and arranging them with intention, not the size or cost of your setup.