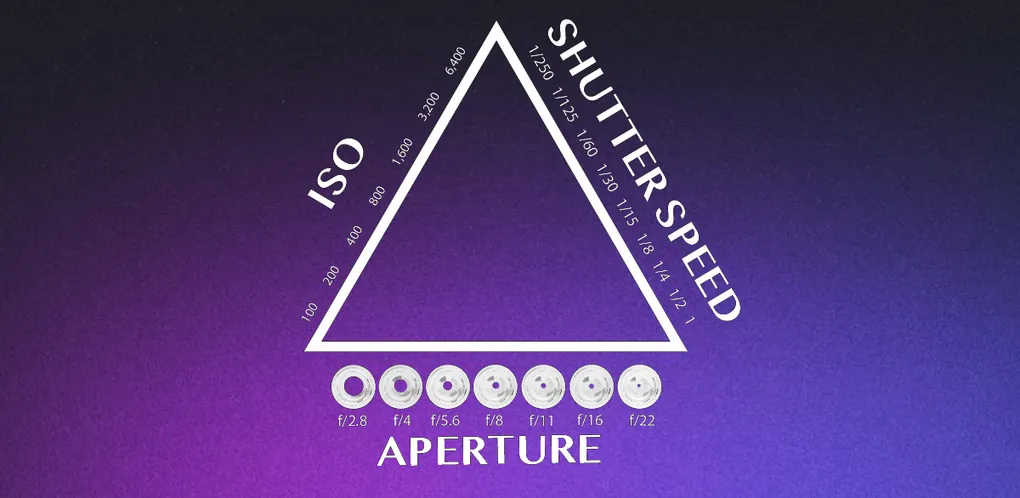
Switch your camera to Manual mode and just three settings control every exposure: shutter speed, aperture, and ISO. Learn how those three balance against each other, what’s called the exposure triangle, and you can walk into almost any lighting situation and get the shot you want.
That’s the whole game at the start. Everything else in photography (lenses, composition, editing) builds on top of these three controls. Get them right and your photos are sharp, well-lit, and intentional. Get them wrong and even a beautiful scene comes out blurry, dark, or grainy.
Here’s how each setting works, what it does to your image, and how to balance all three.
The Exposure Triangle at a Glance
Each setting controls the brightness of your photo, but each one also changes the look of the image in its own way. That side effect is why you can’t just crank everything to “more light.”
| Setting | Controls brightness by | Creative side effect | Typical beginner range |
|---|---|---|---|
| Shutter Speed | How long the sensor sees light | Freezes or blurs motion | 1/1000s to 1/60s handheld |
| Aperture | How wide the lens opening is | Blurry or sharp background | f/1.8 to f/8 |
| ISO | How sensitive the sensor is | Clean or grainy (noisy) image | 100 to 1600 |
Every setting is measured in stops. One stop is a doubling or halving of light. That shared unit is the trick: if you let in one stop more light with the aperture, you can use a shutter speed one stop faster to cancel it out and keep the same brightness. The three settings are levers that move together.
Shutter Speed: Freeze or Blur Motion
When you press the shutter, light passes through the lens and lands on the sensor. Shutter speed is simply how long that lasts, measured in fractions of a second.
A fast shutter speed (like 1/1000s) exposes the sensor for a tiny slice of time, freezing fast action in crisp detail. A slow shutter speed (like 1/15s or several full seconds) lets the sensor gather motion, which blurs anything that moves.
- Freezing a sports moment or a bird in flight: 1/1000s or faster.
- A person walking, a handheld street shot: around 1/250s.
- Silky waterfalls, light trails, star photography: 1/2s to 30s, on a tripod.
One rule worth memorizing: handheld, keep your shutter speed at least 1 over your focal length to avoid blur from your own hands. With a 50mm lens, don’t drop below roughly 1/50s. Go slower than that and you’ll need a tripod or stabilization.
Aperture: Control What’s in Focus
Aperture is the size of the opening inside the lens, written as an f-stop like f/1.8 or f/11. The numbers feel backwards at first: a lower number (f/1.8) is a wider opening that lets in more light, and a higher number (f/11) is a smaller opening that lets in less.
Beyond brightness, aperture controls depth of field, meaning how much of the scene is in sharp focus:
- Wide aperture (f/1.8 to f/2.8): more light, plus a shallow depth of field that throws the background into soft blur. Perfect for portraits where you want the subject to pop.
- Narrow aperture (f/8 to f/16): less light, but front-to-back sharpness. Ideal for landscapes where you want everything crisp.
How much background blur you can get also depends on your glass, which is one reason the types of camera lenses you own matter. If you’re still getting comfortable with focal lengths and f-stops, the camera lens basics guide is a good companion to this one.
ISO: Sensitivity and Noise
ISO controls how sensitive your sensor is to light. A low ISO (100 or 200) is the cleanest setting and works great in bright conditions. As you raise ISO (800, 1600, 3200 and up), the camera amplifies the signal so you can shoot in darker scenes without a flash, at the cost of introducing grain, called noise.
Think of ISO as your last resort for brightness. Set your shutter speed and aperture first for the look you want, then raise ISO only as much as you need to reach a proper exposure. Modern cameras handle high ISO far better than older ones, but every sensor has a point where the grain gets distracting, so it pays to know your own gear’s limit. For a deeper look at when pushing it is actually the right call, see what ISO is in photography.
How to Balance All Three
Because every setting is measured in stops, a good exposure is rarely a single “correct” combination. It’s a balance you choose based on what the shot needs. Picture three sliders: push one toward more light and you can pull another back to compensate.
For example, shooting a portrait indoors:
- You want a blurry background, so you open up to f/2.
- Your subject is fairly still, so 1/200s is plenty to keep them sharp handheld.
- The room is dim, so you raise ISO to 800 to bring the exposure up to a good level.
If the photo comes out too dark, you have three ways to fix it: slow the shutter, widen the aperture, or raise the ISO. Too bright, and you do the reverse. Each choice has a trade-off in motion, focus, or grain, and learning to pick the right one is what shooting in manual is really about.
A simple decision order keeps it manageable in the moment:
- First, decide motion. Freeze it or blur it? That sets your shutter speed.
- Second, decide focus. Blurry background or everything sharp? That sets your aperture.
- Last, fix brightness. Use ISO (and small tweaks to the other two) to land a balanced exposure.
Start Shooting
You don’t need to jump straight into full manual. Aperture priority mode (marked A or Av) is the ideal training ground: you choose the aperture and ISO, the camera handles the shutter speed, and you start seeing how depth of field changes your images. As that becomes second nature, switch to manual for full control in tricky light.
The fastest way to make this stick is to shoot the same scene at different settings and compare the results. Photograph a moving subject at 1/1000s and again at 1/30s. Shoot a portrait at f/1.8 and at f/8. Seeing the difference on your own photos teaches more than any chart.
From here, the natural next steps are color (start with white balance) and composition (try framing in photography). And if you’re still choosing gear, the guide to the best camera for beginners will point you in the right direction. Take your time, experiment often, and enjoy the process.