White balance is one of the most critical yet often overlooked settings in photography. Incorrect white balance can cause images to appear unnaturally orange, blue, or even green, affecting the overall quality of the shot. By understanding how white balance works and how to adjust it correctly, photographers can ensure color accuracy and create visually appealing images.
What Is White Balance in Photography?
White balance refers to the process of adjusting the colors in a photo to make them appear as natural as possible. The camera’s goal is to replicate what the human eye sees in terms of color under various lighting conditions. When set correctly, white balance ensures that whites appear white, and all other colors in the scene are accurately represented. If miscalibrated, images can develop unnatural color casts, such as excessive warmth (orange) or coolness (blue).
Automatic White Balance
Most cameras come equipped with an Automatic White Balance (AWB) setting, which adjusts color temperature based on the scene’s lighting. While convenient, AWB can sometimes produce inconsistent results, especially under complex lighting conditions, such as mixed artificial and natural light. In these cases, it’s useful to explore other white balance options that allow more manual control.
Preset White Balance Options
Cameras also provide preset white balance settings designed to match specific lighting conditions. These presets, such as “Daylight,” “Shade,” “Tungsten,” and “Fluorescent,” are helpful when you know the type of lighting in your scene. For example, if shooting indoors under incandescent lights, selecting the “Tungsten” setting can neutralize the warm orange glow typical of such lighting. Outdoors, the “Shade” preset is useful to offset the cooler blue tones common in shaded areas.
Kelvin White Balance
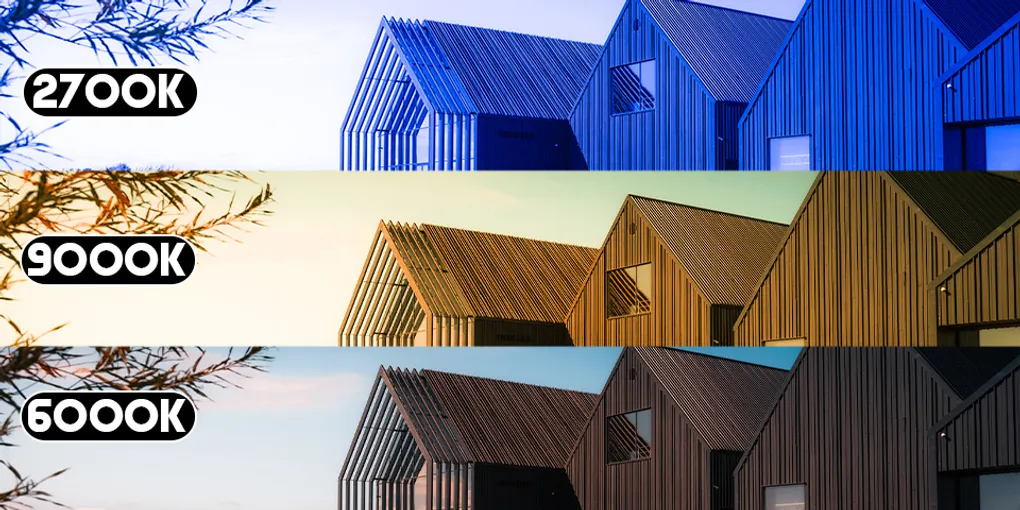
For more precise control, photographers can manually adjust white balance using the Kelvin scale, which measures color temperature in degrees. Lower Kelvin values (around 2500K) correspond to warm light, while higher values (around 7000K) represent cooler light. Using a custom Kelvin setting gives photographers the ability to fine-tune their white balance for exact color accuracy. Tools like gray cards or color charts can assist in calibrating the white balance for consistent, reliable results across different lighting environments.
Methods for Achieving Accurate White Balance
There are two common methods for setting white balance manually:
-
Using a white piece of paper: Many cameras allow users to capture a custom white balance by photographing a neutral white surface under the same lighting as the subject. Place a white sheet of paper about 1-2 meters in front of the camera, and let the camera read the light reflected from the paper. This method is simple and effective for quick adjustments.
-
Using a white lens cap: A more advanced approach involves using a white balance lens cap. This tool, which functions like a filter, is attached to the lens, allowing the camera to read and set the white balance automatically. This method provides more consistent results in varying lighting conditions, ensuring accurate color reproduction across multiple shots.
In both cases, it’s essential to ensure proper exposure during calibration, as incorrect exposure can impact the camera’s ability to set the white balance accurately.
Common White Balance Kelvin Values
Here’s a quick reference for typical color temperatures you’ll encounter:
- 1800K–2500K: Candlelight. Very warm, orange tones.
- 2500K–3500K: Tungsten / incandescent bulbs. Warm, yellowish light.
- 3500K–4500K: Fluorescent lighting. Slightly cool, can appear greenish.
- 5000K–5500K: Daylight / midday sun. Neutral, balanced light.
- 5500K–6500K: Cloudy sky. Slightly cool, soft blue tones.
- 6500K–8000K: Shade. Cool, blue-tinted light.
- 8000K–10000K: Heavy overcast or twilight. Very cool, blue tones.
Setting a lower Kelvin value tells the camera the light is warm (so it compensates by cooling the image), and a higher value tells it the light is cool (so it warms things up). This is counterintuitive at first, but it becomes second nature with practice.
When White Balance Goes Wrong
Incorrect white balance is one of the most common mistakes, especially in mixed lighting situations, for example, a room lit by both window light and tungsten lamps. In these cases, no single white balance setting will be perfect for the entire scene. Your options are to either match the dominant light source, use a custom white balance reading, or shoot in RAW and correct it later, where the Capture One vs Lightroom choice matters because their color editors work quite differently.
The telltale signs of bad white balance: skin tones that look sickly yellow or unnatural blue, white surfaces that have a strong color cast, and overall images that just feel “off” even though the exposure is correct.
Conclusion
Mastering white balance is essential for capturing images with true-to-life colors. While automatic white balance can work in simple lighting situations, using presets or manually adjusting the Kelvin setting will help photographers achieve better results. By practicing these techniques, photographers can avoid common color issues and produce consistent, high-quality images.