Aerial drone photography changes how you see and compose. Scenes that look ordinary from the ground become graphic patterns and miniature landscapes when viewed from above. A river becomes a ribbon. A forest becomes a texture. A coastline becomes a study in color contrast.
Camera settings, flight technique, weather conditions, and legal requirements all affect the final image. This guide covers the equipment, settings, and drone photography tips that produce sharp, well-composed aerial shots.
What You Need Before Flying
The legal and practical requirements come first because they limit where and how you can fly.
Registration and licensing. In the US, the FAA requires commercial drone pilots to hold a Part 107 Remote Pilot Certificate. The test covers airspace classification, weather, regulations, and emergency procedures. Recreational flyers must pass the free TRUST test.
In the EU, the rules are harmonized under EASA but administered nationally. For example, in Germany, operators must register with the Federal Aviation Office (Luftfahrt-Bundesamt) if their drone weighs more than 249g or carries a camera, even on sub-250g models. Registration produces an electronic ID (e-ID) that must be physically marked on all your drones. To fly in the Open category, remote pilots need at minimum the EU Certificate of Competency A1/A3, a free online training and test provided by the LBA. Operating in subcategory A2 (flying closer to people with heavier drones) requires an additional theory exam taken at a designated testing center. Proof of competency must be completed before your first flight.
Other countries have their own frameworks. Check before you travel.
Restricted airspace. Airports, military bases, national parks, and certain urban areas have no-fly zones. Apps like Aloft (formerly Kittyhawk), AirMap, and the FAA’s B4UFLY show restricted areas in real time. Flying in controlled airspace without authorization is a federal offense in the US and carries heavy fines.
Insurance. Liability insurance for drone operations is mandatory in some regions and strongly recommended everywhere. A drone falling from 200 feet can cause significant property damage or injury. Annual policies for hobbyists start around $50; commercial coverage costs more but is a business expense worth bearing.
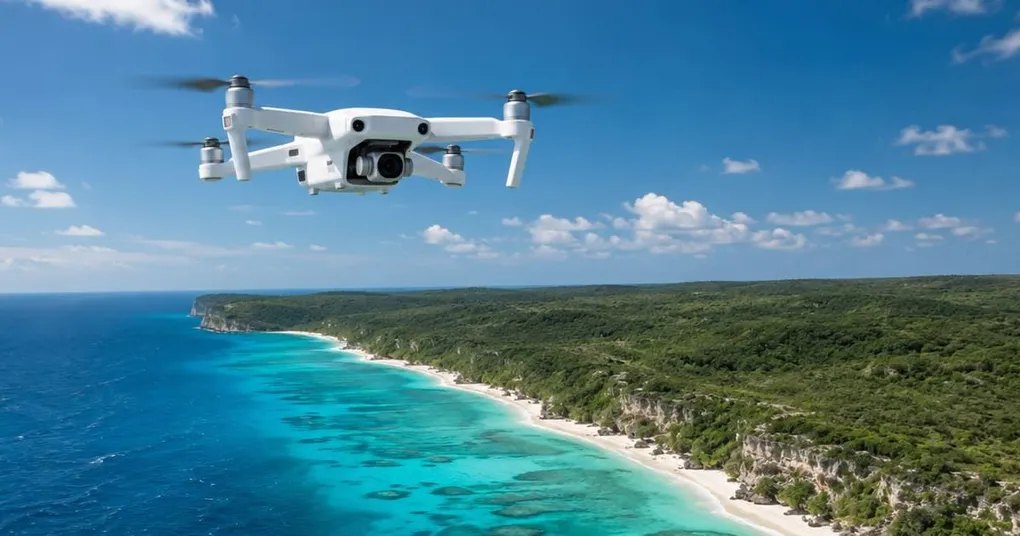
Choosing a Drone for Aerial Photography
The drone market has matured to the point where even entry-level models produce strong image quality. The main factors that separate them are sensor size, lens quality, flight time, and obstacle avoidance.
| Tier | Sensor | Photo Resolution | Price Range | Best For |
|---|---|---|---|---|
| Entry | 1/1.3" CMOS | 48 MP | $700–900 | Beginners, travel, social media |
| Mid-range | 1" CMOS | 20 MP | $1,000–1,600 | Enthusiasts, semi-professional work |
| Professional | Micro Four Thirds | 20 MP | $2,000–4,000+ | Commercial work, fine art prints |
Entry-Level Drones
The DJI Mini 4 Pro and similar sub-250g drones produce surprisingly capable aerial photographs. The 1/1.3-inch sensor captures good dynamic range, and the 48-megapixel stills have enough resolution for web use and moderate prints. The main limitation is the fixed aperture lens, which means you cannot control depth of field.
The sub-250g weight class matters for regulations. In many jurisdictions, drones under 250 grams face fewer restrictions, making them easier to fly legally in more locations.
Mid-Range Drones
Drones like the DJI Air 3 and Autel EVO Lite+ use 1-inch sensors that perform noticeably better in low light and high-contrast scenes. The larger sensor captures more dynamic range, which matters for aerial photography because the sky and ground often have several stops of exposure difference between them. Adjustable aperture on some models gives you control over shutter speed without relying on ND filters.
Professional Drones
The DJI Mavic 3 Pro and similar platforms carry Micro Four Thirds sensors that rival many ground-based cameras. Multiple lens focal lengths on a single platform (wide, medium, telephoto) let you compose from the same position without repositioning the drone. These drones are built for commercial aerial photography where image quality directly affects revenue.
For drone photography for beginners, an entry-level or mid-range drone is the practical starting point. The skills transfer directly to more capable equipment later.
Camera Settings for Drone Photography
Drone cameras are small-sensor cameras in the sky. The same exposure principles apply, with adjustments for the unique challenges of shooting from a moving, vibrating platform.
| Setting | Recommended Value | Reason |
|---|---|---|
| Format | RAW | Preserves detail for post-processing |
| ISO | Base (usually 100) | Minimizes noise on small sensors |
| Aperture | f/2.8–f/5.6 | Sweet spot for lens sharpness |
| Shutter speed | 1/500 or faster | Freezes drone vibration and movement |
| White balance | Manual (preset or Kelvin) | Consistency across shots in a series |
Shoot RAW, always. Drone sensors are small and capture less dynamic range than a full-frame camera. RAW files give you the latitude to recover shadow detail in underexposed ground areas and pull back highlights in overexposed skies. See our RAW vs JPEG guide for why this matters.
Shutter speed is the most critical setting. Drones vibrate in flight, even when hovering. A shutter speed of 1/500 or faster freezes that vibration. In low light, raise ISO rather than slowing the shutter; a slightly noisy but sharp photo is always better than a noise-free blur.
ND filters extend control in bright conditions. On drones with fixed-aperture lenses, ND filters are the only way to slow the shutter for video or create motion blur in water. For still photography they are less critical because you want fast shutter speeds anyway.
Use manual white balance. Auto white balance shifts between shots as the drone changes angle relative to the sun. Setting a fixed value (5500K for daylight, or the appropriate preset) keeps the color consistent across a series, which matters when stitching panoramas or editing a batch.
Composition Techniques for Aerial Shots
Good drone photography uses the same compositional principles as ground-based work, but the elevated perspective creates opportunities that do not exist at eye level.
Top-Down (Nadir) Shots
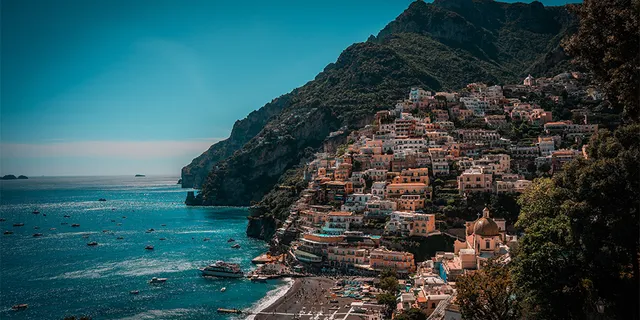
Shooting straight down eliminates the horizon and turns the landscape into a flat, graphic composition. Roads become lines, fields become shapes, and water becomes a mirror. Top-down shots work best when the ground has strong color contrast, repeating patterns, or geometric forms.
Look for intersections between natural and man-made elements: a road cutting through a forest, a river meeting a coastline, a bridge spanning a gorge. The contrast between organic and geometric forms creates visual tension that draws the eye.
Oblique Angles
Shooting at a 30- to 60-degree angle from horizontal combines the overview of an aerial shot with the depth of a landscape photograph. This angle shows the horizon and maintains a sense of scale, making it the most versatile perspective for aerial drone photography.
The leading lines and framing techniques that work in landscape photography apply directly here. Rivers, roads, fences, and shorelines all function as strong leading lines from above. Tree canopies, rock formations, and building shadows can frame your main subject.
Low Altitude Perspectives
Flying at 20 to 50 feet produces images that feel elevated but still connected to the ground. This altitude is ideal for real estate photography, showing a property in relation to its immediate surroundings without losing detail. It also works for intimate landscape shots where you want to show texture in the foreground while still capturing the broader context.
Scale and the Human Element
Including a person, vehicle, or building in an aerial shot provides an immediate sense of scale. A vast landscape photographed from above can look abstract and hard to read without a reference point. A single hiker on a trail or a boat on a lake tells the viewer exactly how large the scene is.
Flying Techniques for Sharp Photos
Drone movement during exposure is the biggest enemy of sharp aerial images. These techniques minimize it.
Hover, then shoot. Bring the drone to a stable hover, wait two seconds for the gimbal to settle, then trigger the shutter. Shooting while the drone is moving or turning introduces motion blur even at fast shutter speeds because the gimbal cannot fully compensate for rapid directional changes.
Avoid shooting in wind above 15 mph. Drones fight wind by adjusting motor speed constantly, which increases vibration. The gimbal compensates for most of it, but high-frequency vibration still reaches the camera. Early morning and late afternoon tend to have calmer air, which also happens to coincide with the best light.
Use the grid overlay. Most drone apps offer a grid or rule-of-thirds overlay on the live view. It helps with composition in real time and keeps horizons level. Enable it and leave it on.
Shoot in bursts. Taking three to five frames in quick burst mode gives you options. Even in a hover, micro-vibrations affect individual frames differently. Picking the sharpest frame from a burst is easier than repositioning the drone and trying again.
Light and Weather Conditions
Aerial photography follows the same light principles as outdoor photography, with a few drone-specific considerations.
Golden hour is ideal. The low sun angle creates long shadows that reveal terrain texture and depth. From above, shadows become compositional elements that add dimension to an otherwise flat scene. Golden hour also produces warm color tones that make landscapes more visually compelling.
Overcast days work well for top-down shots. Flat, even light eliminates harsh shadows that can obscure detail when shooting straight down. Colors appear more saturated under overcast skies, which benefits top-down compositions of fields, water, and urban patterns.
Avoid midday sun for oblique angles. Direct overhead light produces short, hard shadows and washes out color. The exception is top-down shooting, where midday light can work because the lack of shadows creates the flat, graphic look that makes nadir compositions compelling.
Check weather before every flight. Wind, rain, and temperature all affect flight performance and image quality. Most consumer drones are not waterproof; even light rain can damage the gimbal and electronics. Cold temperatures reduce battery capacity, sometimes by 30% or more. Always check the forecast and plan your flight time with a safety margin on battery life.
Post-Processing Aerial Images
Drone RAW files benefit from the same adjustments as any landscape photograph. A few corrections come up frequently.
Lens correction. Drone cameras use wide-angle lenses with noticeable distortion. Applying the lens profile correction in Lightroom or Camera Raw straightens horizons and removes barrel distortion. This is the first edit to make on every aerial photo.
Exposure blending. The contrast between sky and ground is often extreme from above. Bracket exposures (most drones support auto-bracketing) and blend them in post, or use graduated filters in Lightroom to darken the sky while brightening the ground.
Color grading. Aerial shots tend to look their best with slightly enhanced saturation and a subtle boost to clarity. Avoid heavy processing; the appeal of drone photography lies in the perspective itself, not aggressive editing.
Building an Aerial Photography Practice
Start in an open area with no obstacles and no people: a field, a beach, or a large park. Practice hovering precisely, flying controlled patterns (squares, circles, figure-eights), and framing shots at different altitudes and angles. The flight skills become automatic faster than you expect.
Once the basic controls feel natural, plan shoots around specific subjects and conditions rather than flying aimlessly. Check the weather, pick a location, decide on the angles and compositions you want, then execute. This approach produces more consistent results than casual flying.
For photographers building a portfolio of aerial work, organizing and presenting those images matters as much as capturing them. A dedicated photography portfolio that showcases your aerial perspective helps potential clients understand what you offer. Sharing finished work through client galleries gives recipients a professional experience and makes it easy for them to download, share, and license your images.